Transporting a kayak can pose quite a dilemma. Once you’ve invested in a pricey kayak, the last thing you want is to incur additional expenses for its transportation.
Whether you’re considering mounting it on a roof rack, using a travel trailer, or exploring other methods, the costs can add up. This can be particularly daunting for beginners.
In this discussion, we will explore a cost-effective method for transporting two kayaks on a roof without the need for a roof rack.
Table of Contents
Method one: Using foam block
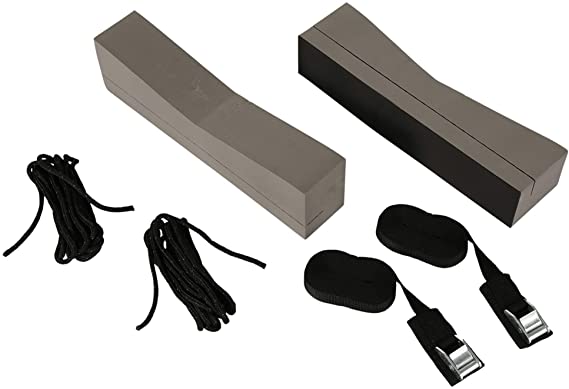
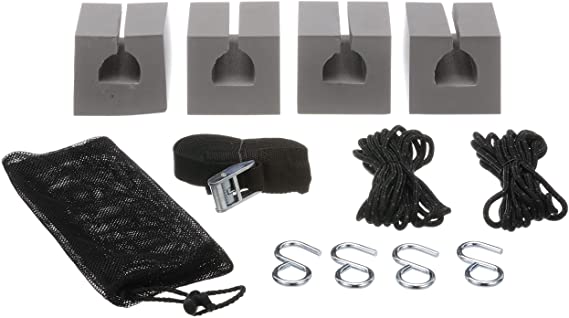
Kayaks can be transported using foam blocks. These are very low cost, easy to install items with just ropes and straps. Using these foam blocks you can travel with your beautiful kayak to a long destination.
Necessary items
Two foam blocks, straps, ropes, hooks, floor mat or towel, etc. These items are cheap. It could cost about 70 dollars.
How to do this
Step one: Placing kayak on the roof
Place a floor mat on the hood or a towel or anything that will protect your car from scratch. Then slide your kayak on the floor mat and place the kayak on the roof.
Many people also do it from the side of the vehicle. But if your kayaks are heavy then it will be tough for you to get there. In this case, sliding from the hood is a good idea.
Step two: Inserting foam blocks and securing
Insert the strap into the groove of the foam block. Now, place the foam block underneath your kayak. Then make a loop with the ends of the strap around the forward door. Then tighten the strap.
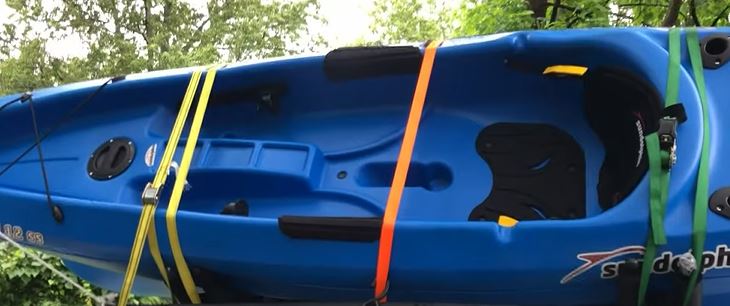
Here is a note for your kayak placement. You can put your kayak in an upside-down position or downside on the roof. I will recommend keeping the upside-down position. This will make more contact with the foam block hence greater rigidity. Also, the kayak hull will help you drive with less obstruction due to its streamlined shape.
After placing forward foam block, place rear one at three to four feet distance. Tie-down the foam block making a loop around the rear door same as the forward door.
Step 3: Securing the kayak
After placing both foam blocks use the longer strap for tying the kayak. First, make a loop around the kayak at the forward foam block position. Then, take two terminals of the strap inside the forward door. And complete the knot by tightening the terminals.
Do the same things for the rear. Now, you are ready to drive your car keeping your 2 kayaks on roof without rack. But here is an advice that should keep in mind. You should tie your kayak from the scupper hole to toeing mount of your car. This will give you extra safety during braking or acceleration.
Advantages of using foam blocks:
- It is easy to install. No expertise is required for this method.
- Cost-effective. Most of the roof racks are costlier than a kayak nowadays.
- Keep your vehicle as it is. Since no welding, screwing is necessary.
- Universal system. It is suitable for almost all types of vehicles.
Disadvantages of using foam blocks:
- Safety is not as good as a roof rack.
- You have to accelerate and brake your vehicle carefully. Because hard brake can make your kayak slide.
Method two: Using pool noodles
Necessary items
Two noodles, ropes, straps, floor mat, etc.
How to do this
This method is the same as the foam block method. Just instead of using foam block, you can use noodles for protecting your kayak as well as the roof of your vehicle.
All the processes are similar to the foam block method from placing the pool noodles to tightening the kayak with the help of straps to your vehicle.

For 2 kayak, just put one kayak on top of the other by placing pool noodles in between them. Placing noodles between two kayaks will prevent them from any damage or sliding during transport.
Advantages of using pool noodles:
- Low cost
- Easy to install
- Very little knowledge is required to set up
Disadvantages of using pool noodles:
- Less secure
- A hard brake can cause kayak slide
Method 3: Using pieces of a foam block
Necessary items
Foam blocks, straps, ropes, and floor mats.
Let’s watch and read the process of how you can strap two kayaks on the roof without a rack.
How to do this
This method is also the same as the previous one. The only difference is the straps requirement. Here no strap is required for tying foam blocks. Because we will use only pieces of a block not the whole length of a block.
Four pieces of foam block are needed to be cut down measuring five to six inches long from a foam block if you purchase long foam blocks. Small pieces of foam blocks are also available in the market. You can get those from Amazon.
Now, mount those pieces of foam block to the kayak’s rim/side edges so that the groove of the foam blocks embraces the kayak rim.
Then place the kayak in an upside-down position. And adjust the pieces of foam block so that the kayak remains in equilibrium.
Then use straps to tighten your kayak at two positions same as the previous method. Also, use ropes for the bow and stern side of your kayak through the scupper hole to toeing mount. This will prevent your kayak from sliding during hard brake.
This method is suitable for a sit-on-top kayak. Because in a sit-on-top kayak, the rim is available for a long area which is good for the stability of the kayak on the roof of the vehicle.
But a sit-in kayak has a very small rim area which is not perfect for this method. The distance between forward and rearward blocks will be smaller in a sit-in kayak which is not good for the stability of the kayak on the roof.
Advantages of using pieces of a foam blocks:
- It is less costly than the full-length foam blocks method
- Easier installation than full-length foam blocks
- Less straps require. Require only for tying the kayak to the vehicle, not the blocks
- Anyone can install it
Disadvantages of using pieces of a foam blocks:
- Only good for sit-on-top kayak
- Less secure than previous methods.
Method 4: Using pool noodles for two kayaks
For carrying 2 kayaks on roof without a rack, this one is the simplest one. As we described earlier about the pool noodles technique, this method is also similar to that.
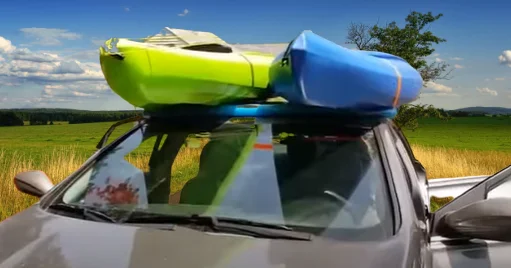
So, here we will discuss only placing kayak. So, first place pool noodles on the roof. Then put one kayak on one side of the roof of your vehicle. Put the other kayak resting at an angle onto the first one so that its side rides on the first kayak.
Keep in mind that place the middle portion of your kayak at the center of your roof. Before tightening, make sure that both the kayak is on the noodles. Now for proper tightening, make sure that strap buckles are at the same position on both sides of kayaks.
Now, using straps tighten both together with the help of your partner. The tightening process is the same as previous processes. Give some quick push to kayaks for ensuring tightness.
Necessary items are listed below for this method:
- Pool noodles for supporting the kayaks
- Ropes for tying pole noodles
- Straps for tying kayaks with the car
- Floor mat for scratch free kayak loading
Our pick
Here we discussed different methods of carrying 2 kayaks on roof without rack. All the methods are similar in most cases. Just differences are in material and tying process. In final thought, to carry 2 kayaks on roof without rack, pool noodles method will be good from many perspectives.
Why do we think that? Well, we already described its advantages and disadvantages. Besides this let’s look at some technical things.
Pool noodles are cylindrical in shape. Most of the vehicles have a curvy roof. So on a curvy roof if we use a foam block that has a flat surface may not give you a firm attachment. There could be a gap between the foam block and the roof surface which will not provide you a hundred percent support.
But in the case of pool noodles, their shape can be fitted to any type of roof since it is a rope-like thing. So it will make a firm grip on your vehicle. Hence it will make your kayaks safer than any other method to carry 2 kayaks without roof rack.
Read more…
20 Best Fishing Kayaks Under 1000 dollars!
Alternative methods of carrying 2 kayaks on roof without rack
First of all, thank you for staying with us. These alternative methods are for those who are not feeling satisfied or safe yet. These alternative methods will describe how to carry kayak with a travel trailer, on roof rack, trailer, etc.
Here are those:
- You can carry your kayak on the back of your travel trailer using different types of kayak shelves.
- Use a roof rack. Roof racks could cost you more but will remove your confusion if you feel it.
- Use a bed extender if you have a truck-like vehicle.
- Use a trailer. A trailer can be used for several other purposes also. These are costlier but will give you elegance.
After all, all the methods will not be suitable for all. If anyone has a higher-priced kayak that has heavy mounting and doesn’t want to remove these mounting frequently for them alternative method will be good. Otherwise, for normal kayaking like touring, recreation, etc. methods mentioned above will be good enough. No need to waste valuable money.
Read more…
9 Best Tandem Inflatable Kayaks for 2-3 persons!


Pingback: How long does a kayak last? Tips to increase Longevity! - Safekayaking
Pingback: How to Transport a Kayak Like a Pro - Safekayaking