Have you ever dreamt of kayaking in exotic locations, far from your usual spots? Picture yourself gliding through pristine waters, exploring untouched beauty, and embarking on a journey of discovery. It’s an enticing thought, isn’t it?
However, the excitement of exploring new horizons can be dampened by the logistical challenge of transporting your cherished kayak, and perhaps your partner’s as well.
But fear not, for in this article, we unveil the secrets of effortlessly transporting your kayaks using a travel trailer. So, if you’re ready to unlock a world of kayaking adventures, read on!
Table of Contents
1. Carry kayak in the back of your travel trailer
There are many types of kayak carriers available in the market nowadays. Some of them are costlier than a kayak. In this article, I am going to tell you about a kayak carrier that is easy to install and cost is also lower. So, let’s dive into it.

How to Transport a Kayak Using a VertiYak Kayak Carrier:
Materials You’ll Need:
- VertiYak kayak carrier
- Vehicle with a 2-inch hitch receiver
- Kayak straps and padding (recommended)
- Optional assistance from a friend
Instructions:
- Prepare Your Vehicle:
- Begin by checking that your vehicle is equipped with a 2-inch hitch receiver. If not, you may need to have one installed professionally.
- Assemble the VertiYak Carrier:
- Inside the VertiYak kayak carrier package, you’ll find components such as carrier arms, brackets, and securing pins. Follow the manufacturer’s instructions provided in the manual to assemble these parts correctly. This may involve attaching the carrier arms to the brackets and securing them with the provided pins.
- Attach the VertiYak Carrier to Your Hitch:
- Carefully slide the assembled VertiYak carrier into your vehicle’s 2-inch hitch receiver. Ensure it goes in smoothly and securely.
- Select the Cradle Height:
- Determine the appropriate height setting for the lower cradle based on your kayak’s dimensions. The VertiYak carrier offers three height options: lower, middle, and top.
- Mount the Lower Cradle:
- Locate the lower cradle, which forms the bottom part of the carrier system. Attach the bracket to the cradle with the taller end of the bracket facing upward.
- Insert the cradle into the middle slot and secure it using the temporary safety pin provided.
- Check Ground Clearance:
- Stand back and inspect the clearance between the kayak’s nose and the ground. It is recommended that you should maintain 6 inch ground clearance.
- Carefully place your kayak into the cradle. If it clears the ground comfortably, proceed with the installation.
- Secure the Lower Cradle:
- Remove the temporary safety pin from the cradle and insert the supplied bolt.
- Use the tallest bolt, along with a washer and nut, and tighten them securely to ensure the cradle is firmly in place.
- Install the Upper Beam:
- Position the upper beam on top of the lower beam and insert the small bolt into the hole between the two beams. Tighten it securely.
- Attach the Upper Retaining Arm:
- The upper retaining arm installation follows a similar process as the lower cradle.
- Ensure that the longer part of the bracket is facing downward, and insert the bolt into the bottom hole, allowing for hinge movement.
- Place a washer between the plate and the upper beam to prevent paint damage. Tighten the bolt enough to allow for movement but not so tight that it prevents hinging.
- Add Protective Padding:
- To protect your kayak from scratches, consider adding foam or padding to the frames of the VertiYak kayak carrier.
- Secure the Kayak:
- Utilize kayak straps to firmly secure your kayak to the carrier. You can also add an additional strap in the middle of the kayak for added stability.
- Double-Check Everything:
- Before hitting the road, go over all components one more time.
- Ensure that all bolts, pins, and straps are securely fastened, and the VertiYak carrier is firmly attached to the hitch receiver.
- Drive with Caution:
- When driving, exercise caution, especially when changing lanes or navigating tight spaces. Be mindful of the kayak’s dimensions protruding from your vehicle.
- Unload Your Kayak:
- Upon reaching your destination, carefully remove your kayak from the carrier. Undo all straps and tie-downs, ensuring that you do so safely and without damaging your kayak.
By following these detailed instructions, you’ll be able to install and use your VertiYak kayak carrier with confidence, making it easier to transport your kayak to the best paddling spots.
Always consult the manufacturer’s specific guidelines for your VertiYak model and ensure that your kayak and vehicle are compatible with the carrier.
Here is a video tutorial for Hitch mount kayak carrier for your easy installation.
2. Carry On The Roof Rack
Many travel trailer is loaded with so much stuff that they do not have any space for kayaks to carry. In that case, one option is available for transporting kayaks.
In this section, I will tell how you can carry your kayak on the roof rack. I will describe about the installation procedure of Sport-rack roof rack step by step.
Sport Rack Roof Rack Installation Procedure:
The market offers a wide array of roof racks, each with its own characteristics. Some can be quite expensive and pose a challenge for self-installation.
However, this particular roof rack stands out for its user-friendly installation process and affordability compared to other options on the market.
Within the installation manual, precise measurements tailored to specific vehicle models are provided. The bars themselves are conveniently marked with length indicators, simplifying and expediting the installation process.
Adjustment of the rack’s length is easily achieved by loosening it with an allen key and sliding the ends back and forth as needed.
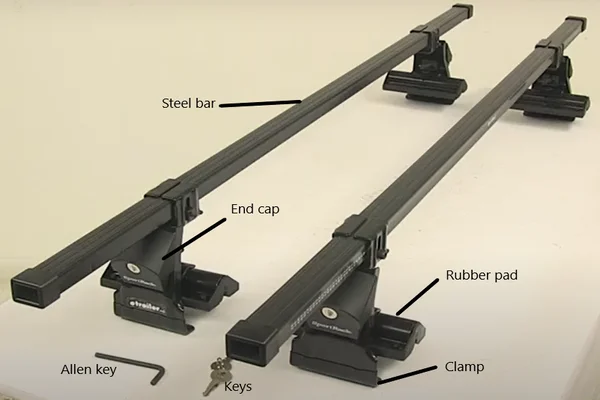
The entire installation kit comprises several components, including bars, end caps, clamps, rubber pads, and keys. The accompanying keys are designed for effortless removal of the end caps. Once the end caps are removed, you’ll discover a bolt that, when tightened with an allen key, securely fastens the clamps to your vehicle’s roof.
Notably, these clamps are thoughtfully coated to ensure they leave no scratches on your vehicle’s pristine surface. Furthermore, the bars themselves are coated with plastic, serving as a protective barrier against rust formation. This comprehensive design not only ensures ease of installation but also safeguards the aesthetics and longevity of your vehicle.
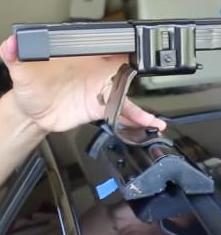
Step one: Remove endcaps and place forward bar
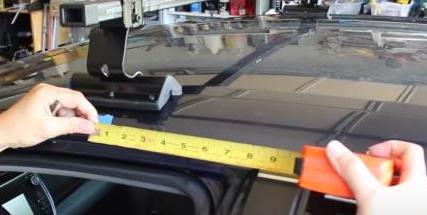
For installing the system first, remove the end caps using the key. Then loosen the sliding rubber pads to adjust the length of the vehicle.
Now the forward bar should be installed as the manual indicated distance from the forward door crack.
If the proper distance is not provided take a distance that is not too far or not too nearer to the door crack.
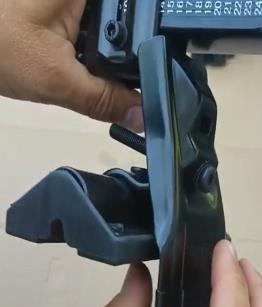
Step Two: Place rubber pad on the groove of roof and tighten the bracket with allen key
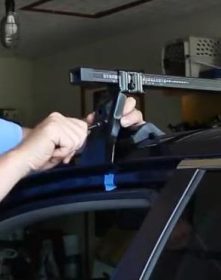
Step Three: Lock the endcaps using key
After placing the rubber pads in the groove then tighten the bolts with an allen key. Finally, place the clamp and tighten both clamp and rubber pads together inserting the bolt into the lower hole of the clamp.
Here you go, lock the end caps for more security using just a twist of the key.

Great! You have done it. You have already known how to install the Sportrack roof rack. So, it is time to go for a drive with your favorite kayaks with your partner. One quick note here for safety is that recheck all the mounting for any mistakes or miss alignments.
3. Put kayak on the roof of the travel trailer
Your travel trailer may not have an option for holding your kayak on the roof. If the backside of the travel trailer is already loaded with other stuff then you can use the roof.
In this case, you need to attach some D ring to hold the strap. You can attach three D rings by drilling the roof. After attaching the rings make sure that the installation is leak-proof. For that, you can apply coating.
Now using a ladder, reach the roof of your trailer. put the kayak on the roof. The nose of the kayak has to hold by looping the strap two turns. The rear of the kayak is also held by looping the strap. For doing this, you can watch the video attached here.
4. Put your kayak on the bed of your trailer
Now if your bed is large enough (at least half of the length of your kayak including the tailgate) and you feel that it is stable then I think you don’t need extra attachment. But before trying that be careful about strapping the kayak.
Firmly strap the kayak with the sidewall mounting of your trailer. Check it by shaking and pulling the kayak. If it is firm enough and you feel satisfied with this process you can try it.
5. Using a bed extender
If you think about cost the best extender will be perfect for you. There are several bed extenders you can use in your trailer. Some of them are L-shaped some are curvy. These are very easy to install compared to previous systems.
Just slide the bar into the hitch of your vehicle and lock it with the pin by inserting it into the hole. Then lock the pin from other side.
Awesome! You have finished all. It’s very simple and easy to use. Just for a note, you can use a foam pad around the frame where your kayak will sit.
This padding will prevent scratching your kayak as well as your new frame. Since peeling off paint can cause rusting to your frame.
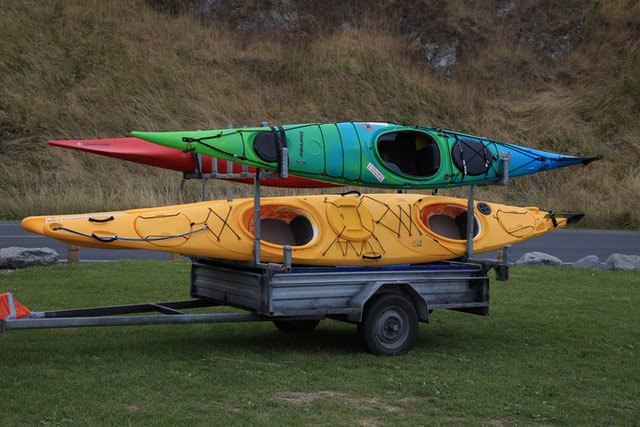
6. Using a Trailer
If you don’t want any hassle this option is for you. In fact, nobody wants hassle before their recreational events. For this, we may need to spend some extra.
A kayak trailer is used to carry not only kayaks but also other stuff too. It will give you elegance during travel with less hassle.
In the market, there are a variety of trailers available. Before getting one you should learn about them which are good for your vehicle. You can use a kayak trailer like Ruff-Sport Trailer, Ironton Personal Watercraft and Boat Trailer Kit, etc.
Finally, I think this article answers the question of how to carry kayak with a travel trailer. Here we discussed several methods of doing it. Which one is best suited for you? Let us know by commenting below. Also, suggest to us if you have done anything better in carrying your kayak with your travel trailer.
Pingback: 2 kayaks on roof without rack - Safekayaking
Pingback: How long does a kayak last? Tips to increase Longevity! - Safekayaking