Are you a kayaking enthusiast in search of the perfect, budget-friendly way to store your prized vessels?
Look no further! In our article, “Kayak Storage Rack Ideas: Cheap and Easy to Make,” we’ve curated a treasure trove of ingenious and wallet-friendly solutions that will revolutionize the way you store your kayaks.
Imagine having your kayaks neatly organized, accessible, and safely stored without breaking the bank. We understand the struggles of kayak owners who grapple with limited space and costly storage options.
That’s why we’ve scoured the world of DIY enthusiasts and storage experts to bring you a curated collection of brilliant ideas that are not only easy to implement but also remarkably cost-effective.
Whether you’re a seasoned DIY enthusiast or just looking for a straightforward way to enhance your kayak storage, our article has something for everyone. From repurposing common household items to crafting custom racks using minimal tools, we’ll guide you step by step through the process.
Join us on a journey to transform your kayak storage setup from chaos to order, all while keeping your budget intact. Our article is your roadmap to achieving kayak storage nirvana, and we can’t wait to show you the way.
So, grab your tools, prepare for some creative inspiration, and let’s dive into the world of “Kayak Storage Rack Ideas: Cheap and Easy to Make.” Your kayaks will thank you!
Let’s begin with the ideas:
- Free standing kayak storage rack plans
- A frame kayak rack plans
- PVC kayak rack plans
Now we will learn each of them what are they and how to make them at what cost.
Table of Contents
1. Freestanding kayak storage rack plans
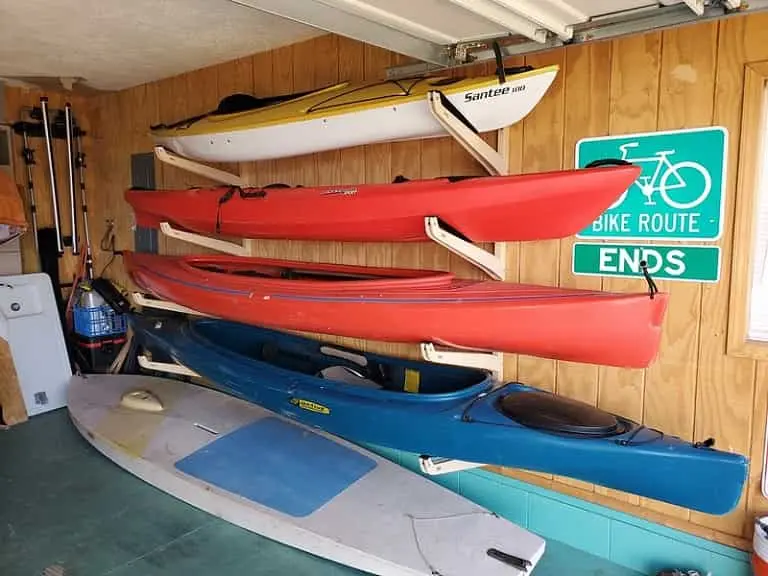
Who does not like freedom in every aspect of life? This freestanding kayak storage rack idea will give you that freedom and will keep you tension free from your location change.
The great specialty of this freestanding kayak storage rack is movability. You can set it anywhere you want. It can be used as a wall-mounted rack for kayak display areas.
So, how can you make this by yourself? Well, it is very easy to make at a low cost by following our instructions.
What will you need to make a freestanding kayak storage rack?
Item required
Wood pieces, Nails, Wood hand saw, Hammer, Measuring tape, Square.
How to make a freestanding kayak storage rack?
Making a free-standing kayak rack is easier than your thought. If you want to make it for multiple locations, you need to think about your lowest ceiling height.
Your garage or store room may have a lower ceiling height. So, if you make a freestanding kayak storage rack that is suitable for your garage but not suitable for your storeroom, it will not serve your purpose for multiple locations.
Though it is not a big deal. My opinion is to make one that is suitable for every location you have. That is why we recommend measuring the height of the tentative location of your rack placement and designing your rack according to the lowest ceiling height.
Now measure your kayak width and height. Your kayak height is important for top storage arms. If you cut the wood according to your ceiling height your kayak may touch the ceiling after putting it on the top rack.
So, consider your kayak height and cut the wood accordingly so that the final rack height has sufficient clearance after putting the kayak on the top shelf.
Now, it is the time to cut and fit. Let’s say, your ceiling height of your garage/storeroom is 8 feet and your kayak deck height is 15 inches and width is 35 inches.
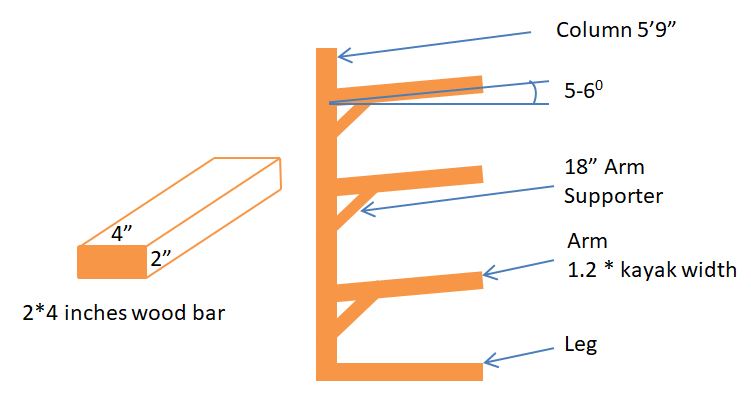
Now, if you plan to make a kayak storage rack for 3 kayaks, you will need to cut 5 types of wood in different lengths. They are for columns, arms, legs, beams, and arm supporters.
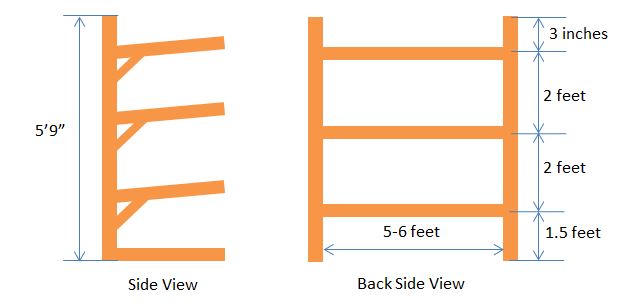
First, cut two columns measuring 5 feet 9 inches in length. The final height of your free-standing rack will be 7 feet leaving 1-foot clearance under the ceiling (5′ 9″ + 1′ 3″ kayak deck height + 1′ ceiling clearance).
Now, Mark 3 positions on these columns for joining the arms. The 1st one will be at 2 to 3 inches below the top edge of the columns.
Put second marking at 2 feet below from the first position ( Considering your Kayak deck height + bracket depth and some clearance). Now, put the third marking similarly at 2 feet below the second marking.
So what do you have now? You still have more than one-foot clearance from the ground.
Ok, Now it is time to cut the arms and support for making the bracket. Cut the arm at a 20% longer length than your kayak width. So, you need to cut 6 arms 42 inches in length for a three-shelf kayak storage rack.
Now, cut six pieces of arm supporters to make a strong bracket to hold your kayak weight. Cut them at a 45-degree angle and 18 inches in length.
Now, cut three beams 5 to 6 feet in length. These beams will determine the length of your kayak storage rack. Again consider your minimum space for storage length.
My recommendation is to cut the beams at a length of 50% to 60% of your kayak length.
Finally, Cut two legs at a similar length to the arms of the rack. So cutting has been done and time to attach them together.
For attaching them, we need steel nails and a hammer. It is very easy for anyone to do it. Join the arms at 5 to 10 degrees inclination to the columns (that is 95 to 100 degrees from the columns) so that the kayak remains supported by the columns after putting it on the shelf.
Do this separately for both columns for all three positions. You can use three to four 2 inches nails for each position. There is no hard and fast rule for this.
Now, join the supporting bar under the arms and join them like the figure to make a perfect bracket.
If all three arms for both the column are done, Join the legs.
You are almost done! Now just add those three beams behind each arm.
Pros & Cons of the Freestanding Kayak Storage Rack
Pros
- It is very easy to assemble at home
- has low-cost involvement
- Can be made from unused wood
- less space required
Cons
- Heavier than plastic racks
2. A frame kayak rack plans
![A frame kayak rack schematic diagram]](https://safekayaking.com/wp-content/uploads/2022/08/A-frame-kayak-rack-schematic-daigram.jpg)
‘A’ frame kayak storage rack is the rack that will look like the letter A. If you have a large fleet, you can think about it. A frame kayak storage rack will allow you to keep a large number of kayaks on a single rack. You can make it at your home without any prior experience with low-cost wood. Let’s talk about it in detail.
Items required
Wood pieces, Hammer, Nails, Steel sheet.
How to make A-frame kayak storage rack?
First of all, think about your fleet size. We will make the A-frame kayak storage rack differently than other makes. The traditional A-frame kayak storage rack has a lower capacity than our plan.
Our plan is to store the kayak not only inside the cross but also outside of the cross. Here is what our plan looks like rather than a traditional one.
Let’s say we have 5 kayaks. So, if we make two shelves on A-frame it will be able to hold 6 kayaks easily.
Now, it is time to prepare the wood bars. We will require four 8 feet bars for the legs of A, two 9 feet cross bars, and Four 9 feet horizontal bars for making shelves on A.


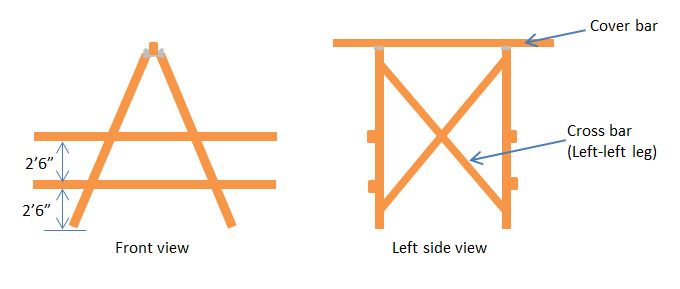
I consider that you gathered all the necessary items. Now get into our project. First, make a head-to-head joint keeping two inches apart using the steel sheet on the top of the bars.
Insert the nails through the flexible steel sheet and the wood bar. 4 to 5 one inch nails for each bar will be sufficient for a rigid joint. Do the same for the other side of the rack. Two A-frames are ready for joining the 9 feet crossbar.
Now, attach the crossbar from left to left legs and right to right legs using one and a half inches nails. Two nails for each joint will be sufficient for holding both the frames.
Ok, frames are ready for attaching the bars for making the shelves. We will place these bars two and a half feet above the ground. The top shelf will also be two and a half feet above the bottom shelf.
So, attach two bars to the two frames at the same height. Use one and a half-inch nails to attach them as required. Do the same for the upper or top shelf (that is 5 feet above the ground).
Awesome! Our A-frame kayak storage rack is ready to use.
If you want further protection for your kayak you can add a cover to the rack. For this, if you attach another bar on the apex of the A-frame extending from front to back of the rack, it will be an excellent cover holder like a tent.
Pros and Cons Of The A-frame Kayak Storage Rack Plan?
Pros
- It has a higher capacity than other methods
- Can be made at home
Cons
- Require a large space to put it
3. PVC kayak rack plans
If you want something that is light in weight and movable, a PVC kayak rack plan is the perfect option. The previous two DIY kayak storage rack plans were made by using spare wood bars or by low-cost items.
There are many PVC kayak storage rack ideas available on the web but many of them are not guided properly. So, I decided to make an excellent procedure to make a PVC kayak storage rack. Let’s jump into the plans.
Item Required
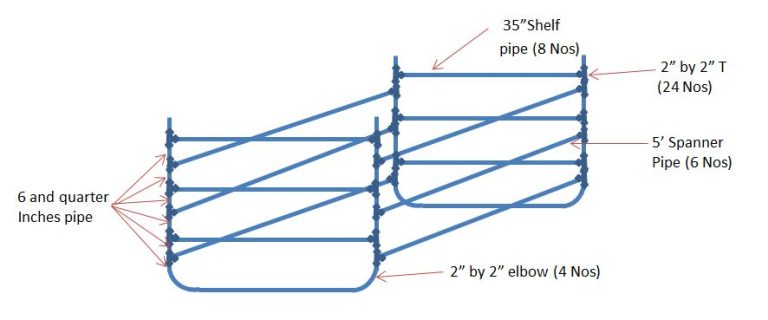
2 inch 70′ (10′ *7) PVC pipe, 4 Elbows (2″ by 2″), 24 pieces T (2″ by 2″), Saw machine (Hacksaw or power saw for pipe cutting), Glue, Rubber hammer.
How to Make a PVC kayak Storage rack?
Before making a PVC rack we should always think about our fleet size. In this plan, we are going to make it for 4 kayaks. If you have more or fewer kayaks, you will need to add more Ts & pipes or remove them in case of low fleet size.
Now, our first plan is to cut the proper size pipes. We are going to make a four-storey kayak storage rack. For this, we have to cut different sizes of pipes.
First, cut eight pipes measuring 35 inches each for two ends of the rack. Cut other six pipes measuring five feet long for spanning the rack.
For making shelves, we need to measure the height of the kayak. For this, measure the maximum height of your kayak. The maximum height may be located in the middle of your kayak.
Ok, we are assuming that your kayak height is 15 inches. Now, cut 24 pipes measuring six and a quarter inches in length for creating the shelf elevation.
Our cutting has been completed. Now it’s time to assemble them together. First, assemble all the fittings without applying glue. If your kayak fits well, then go for the final assembly.
To assemble them, first, join the legs. Add two elbows at the end of 35 inches pipes. Insert two six and quarter inches pipes into the two elbows.
Add two Ts on top of those two pipes pointing the legs of the Ts towards the span of the rack. Then insert another two six and quarter inches pipe into the Ts.
Add two Ts on top of those pipes in such a way so that the T legs are pointing to each other for inserting the shelf pipe. Now insert a 35 inches pipe into those T legs holes.
Again add two 6 and ¼ inches of pipes into the T and add another two T. Just do the same as we did for the first shelf.
After completing the ends of the PVC kayak storage rack add the spanning pipes into the Ts legs. Joining all the spanning racks and putting caps on the opening end of the four columns, our PVC kayak rack is ready to store kayaks.
Now, put your kayaks on the rack shelves. According to our measurements, if nothing is done wrong, I hope your kayak will fit well. If you think that the rack requires some correction, do that before the final assembly.
Hope that everything is ok or corrected, apply glues to all the fitting and pipes that are going to fit one another.
You are done! Many people like to paint their DIY kayak storage rack with their favorite color. Painting is not a thing to discuss here. Anyone can do it. So, if you want to paint your PVC rack, get a one-time painting spray to do that easily.
You can do it with the help of this video.
Pros and Cons of PVC kayak storage rack plans
Pros
- Super lightweight hence easy to move anywhere
- Can dismantle easily if glued is not applied
Cons
- Costlier than other plans discussed earlier
Conclusion
In summary, our exploration of three ingenious kayak storage rack ideas has revealed that affordable and easy-to-make solutions are within reach for everyone.
Whether you prefer the simplicity of PVC pipe racks, the versatility of wall-mounted options, or the eco-friendliness of repurposed materials, there’s a perfect fit for your needs.
By following the guidance provided in this article, you can confidently address your kayak storage challenges, saving both time and money.
Whether you choose one of these methods or adapt them to suit your space, the goal remains the same: keeping your kayaks secure and accessible, ready for your next adventure. Happy kayaking!

Pingback: 20 DIY Kayak Rack Plans You Can Make Easily - DIY & Crafts
Pingback: 23 DIY Kayak Rack Plans